TILs Training Tool Online Help
Content
FAQ-Frequently asked questions
FAQ-Frequently asked questions
Q: I want to use the system but don't have a user account
A: The system is open and free to anyone. But you need to register as user. Just click the register button at the bottom of the login page or click here.
Q: I forgot my password
A: You can reset your password. The system will send you a new password by email. Just click the "forgot password" link at the bottom of the login page or click here.
Q: I forgot my user name
A: The user name is always an email adress. So just try your email address. If you dont remember your email address, please create a new account by registering as new user here.
I need assistance on how to score TILs or how to interpret the images.
We provided a tutorial to help you learn to do a correct TILs scoring. You
will find it a the top menu bar at the very left or also
here.
If you still need assistance, please contact Dr. Roberto Salgado from the TILs
research group:
![]()
I need technical assistance
The manual below explains all steps you can perform in the software.
If you still need technical assistance, please contact the support hotline of
VMscope GmbH:
![]()
1. Concept
The concept of the "TILs training tool" is to learn evaluating TILs and other
diseases with the
help of approved reference images. The "TIL training tool" is not a clinical
tool and is not intended to create or support diagnosis or medical findings. It
is made to help physicians in understanding and scoring TILs.
Only registered users can upload own images to compare them to the reference
images. Users have to agree to the terms of use and have to confirm to have read
and understood the tutorial on how to score TILs.
2. Requirements
2.1 Technical requirements
Technical requirements for the TIL training tool are:
- PC with current web browser
- internet access with at least 128 kBit/sec downstream
- Monitor with at least 1024x768 pixel resolution
- Tablets and smartphones as end devices are not supported
2.2 Functional requirements
To score TILs a user will need:
- Acceptance of the terms of use
- understanding of the tutorial
- valid user account for the system with email adress and password
- at least three reprensentative TIL images per case in jpg or png format
3. Registering as a user
To use the system, you need to be registered as user. If you do not have an account yet, you can only see this documentation and the terms of use.
To register, please perform the following steps:
- Click the "register" link at the bottom of the page
- Please fill in all required user information.
The "email" address is required to send you the registration link with your user account data. The process will only work when providing your correct email address here.
The "Country" item shows a drop down list in alphabetical order. Please select your state here.
"Institute" means the university, hospital, company or facility you are working for.
"Position" means your job title, such as "pathologist". - Please accept the terms of use by clicking the checkbox below the terms of use link and hit the "create" button.
- The system confirms your registration and will automatically send you an email with your user account data. Please check your email account to proceed. The sending of the email might take a few minutes.
- Once you received the registration email you can log in to the system.
Please return to the TILs training tool login page. Enter your email address and the password that has been sent to you by the system. You can and should change your password on your first login. Please see next section on how to manage your user account and change your password.
4. User account and profile
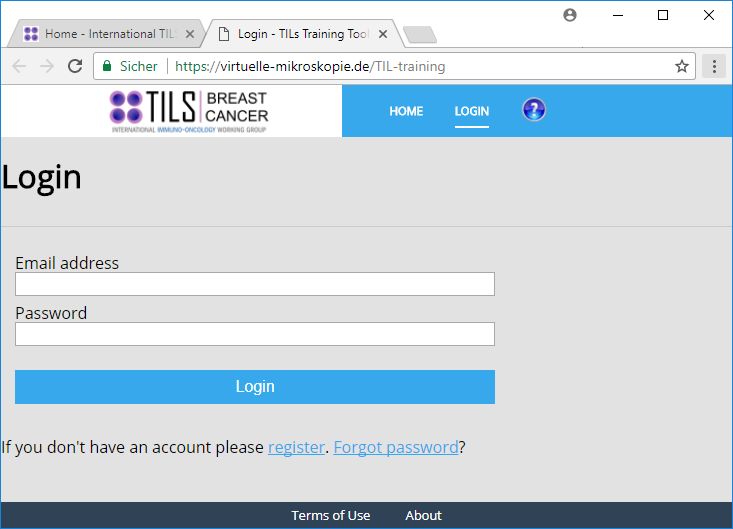
4.1 Login
You can log in using your email adress and password.
If you forgot your password, please click the "forgot password" link at the
bottom of the start page. You will be asked to enter your email adress. Should
this address be registered, the system will generate a new random password and
send it to you. Please log in and again change your password to a personal one
as described below.
4.2 User profile
To change your user data please click the "Profile" menu item at the top menu bar. Your user data will be shown. To change it, please clicck the "Settings" link at the bottom of the user profile page. You will be directed to an "Edit" form where you can alter any user data as described in 3. Click the "Save" button at the bottom to confirm.
To change your password, please click "Change password" at the bottom of the user profile page. To change your password please enter your current password, the new password and again the new password into the text fields shown. Confirm by clicking the "Submit" button. The system will confirm the changes.
4.3 Logout
To log out of the system, just click the "Logout" menu item at the top menu
bar.
You will also be logged out automatically after a long period of inactivity, for
example if you forgot to logout.
5. New Case
5.1. Performing an evaluation
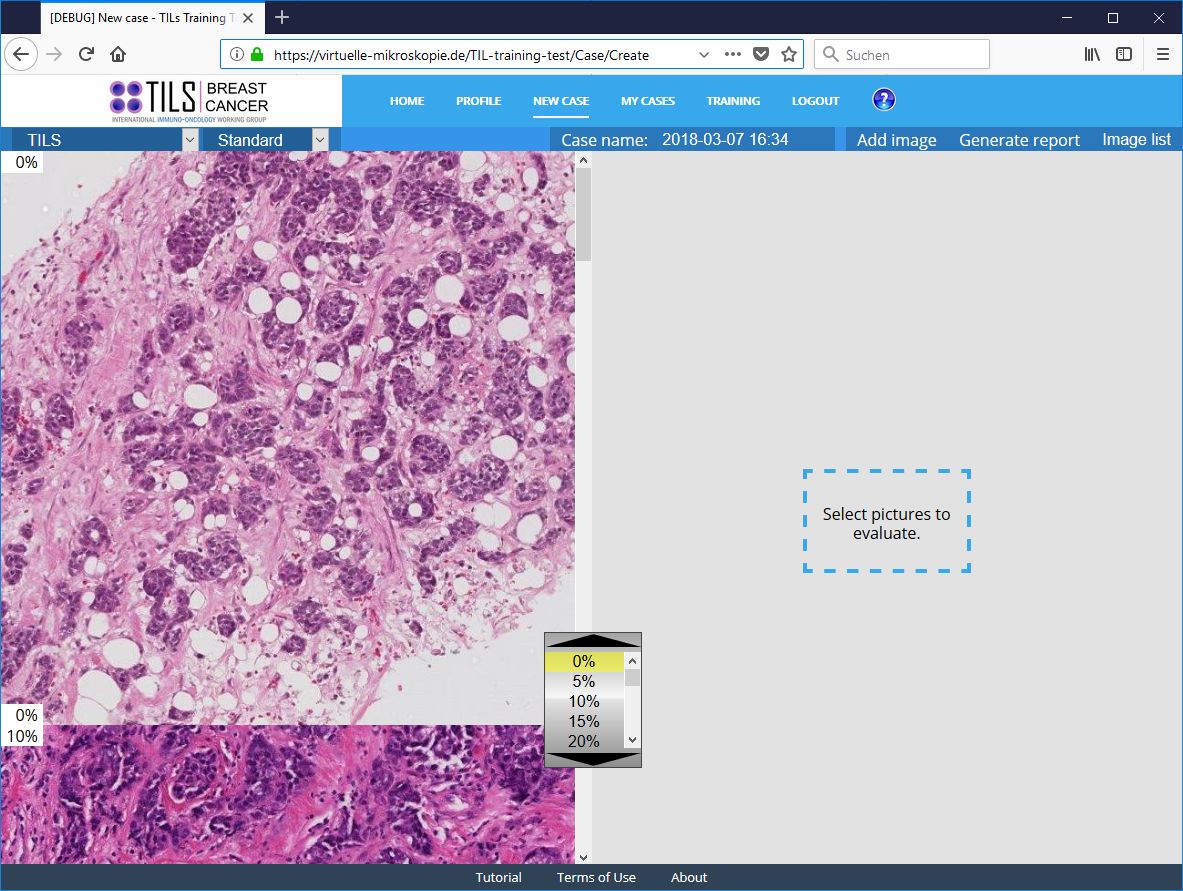
To start an evaluation please log in to the system (see 4.) and click the
"New Case" tab in the top menu bar. You will see reference images on the left
and a blank area on the right.
If you did not yet perform an evaluation with this training tool, you will be
asked to read the tutorial. Please open the tutorial by clicking the "tutorial"
link and be sure to have read and understood it.
To evaluate your case, please perform the following steps:
- Decide for the disease group.
At the top left corner, you will find a drop-down list offering all different diseases, where reference image sets are available. The system will offer the "TILs" reference sets first. To switch to other available diseases, just select one from the list.
- Upload at least three images of the case you want to evaluate.
To do so, simply click the "Select images to evaluate" area in the center of the right field or choose the "Add pictures" menu item at the top right menu bar. You can also use this to add images to an alreday existing case. An "open" dialogue will pop up. Please select the images from your local machine. Images must be in jpg or png format. You can select several images in the dialogue or open the dialogue several times to add more images to your case.
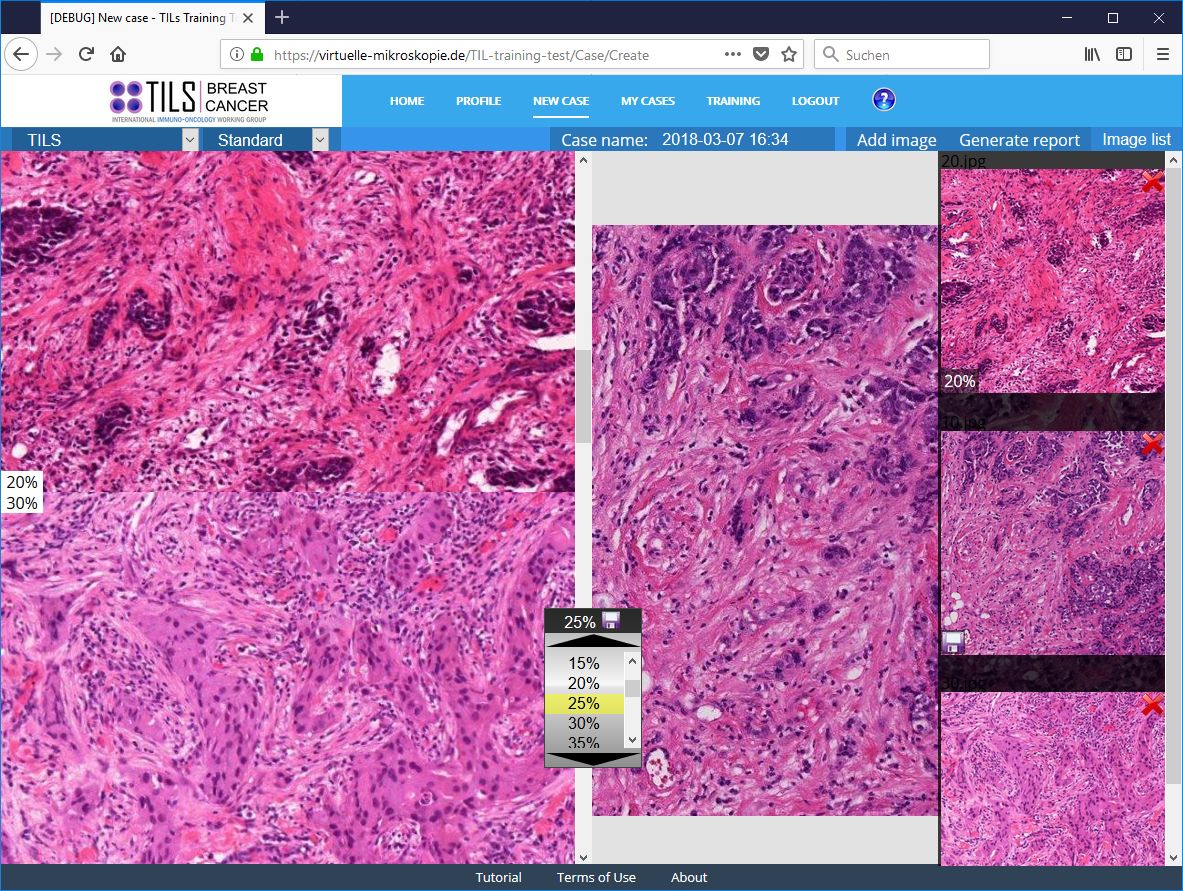
Please note that the first image in the list will be shown in the right window automatically. Other images are hidden and can be chosen by using the image list. - Select and display images of your case
To display an image of your case, click the "Image List" menu item at the top right menu bar. All images of your case will be shown as thumbnail in a vertical list at the right. To hide the image list, just click the image list menu item again. If you click on one of the images in this list, it will be shown in larger size in the right area of the window. An image is always shown completely, and as large as possible, using the available window height. - Delete or add images
To delete images from your case, just click the red cross displayed at the top right corner of every image in the image list. To add more images, just click the "Add pictures" menu item at the top right menu bar. - Evaluate images
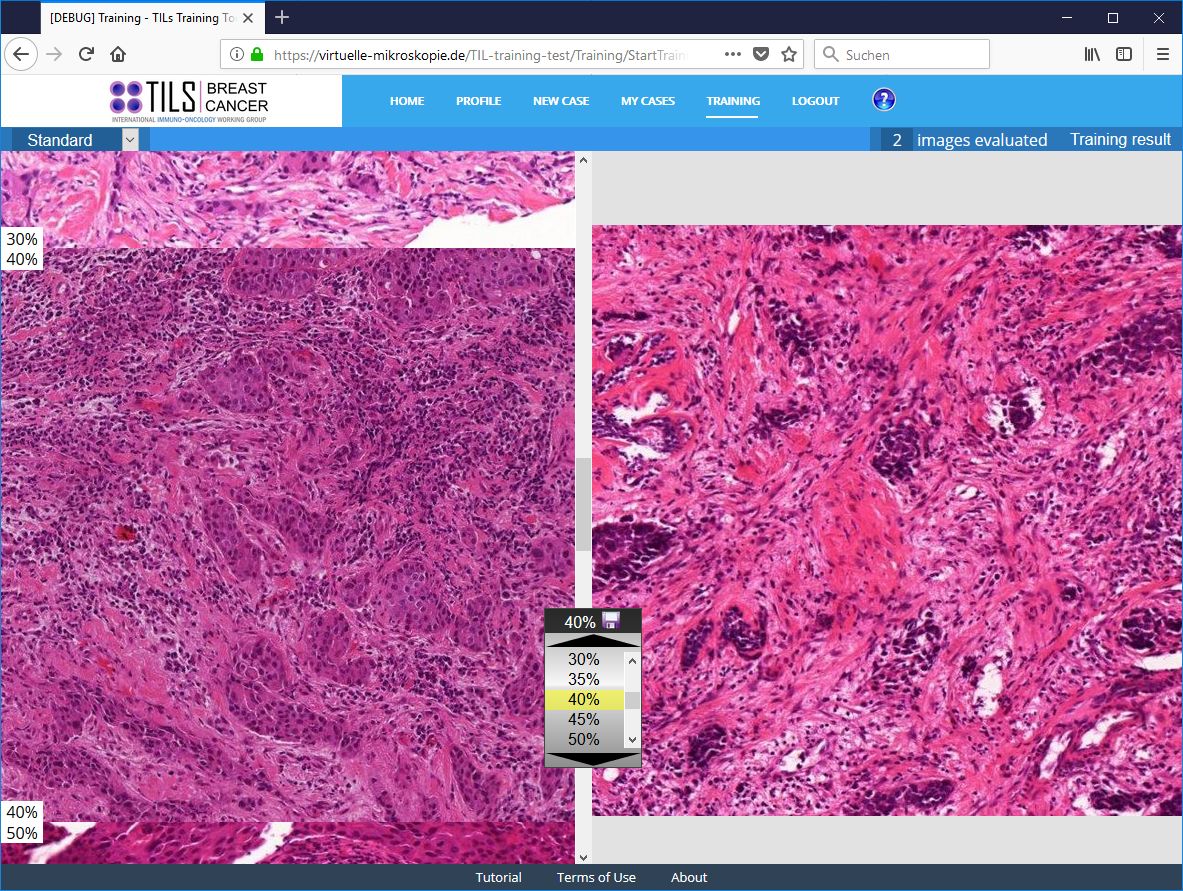
To evaulate an image, open the image list by clicking the "Image List" menu item at the top right menu bar and click on one of the images to evaluate.
Then move the mouse to the reference images at the left window area. The left area shows reference images in a vertical column with ascending rate. To scroll the reference images, use the mouse wheel or click on the rate shown in the center of the window.
The idea is to compare the approved images on the left with your images on the right. Scroll through the reference images to find one, where the rate is similar to the rate of your image at the right. Please note, that reference images might exist only in certain rates and some rates (like 5%, 15%, 25% and so on or low or high rates like over 80%) might be missing. If you select for example "25%", and there are only reference images for 20% and 30%, the system wil show them both and scroll to the middle between those two reference images. To be sure which reference images you see, they will always show their rate in the top and bottom left corner of each reference image.
Some disease groups offer several reference image sets for even better comparison. Select aniother reference set of teh same disease group by using the drop-down list right of the disease group list. You can even switch through the reference image sets while evaluating.
Once you decided for the rate you want to assign to your image, just select the appropriate rate with the reference images on the left and click the "save" symbol on top of the TILs rates wheel or in the bottom left corner of the image thumbnail in the image list. This "save" symbol will only appear after you selected a reference image.
Repeat this process with all images in your image list.
- Generate a report
Generating a report is only possible after you evaluated at least three images per case. See above on how to evaluate your images.
Before generating a report it is useful to name your case. To name the case, you can sinply edit the "case name" text field in the top right menu bar. If you don't choose a name, the system will use the current date and time as default case name.
To generate the report, click the "generate report" menu item from the top right menu bar. A report will be created and dispalyed in your browser in a separate tab. The report shows at the top the average rate of all images of your case and the case name, below it all images to that case and at the bottom the rate of each of these images and the date, time and software version.
Generating the report also leads to having it saved on the training tool server. You can always review your old cases by choosing the "My cases" section. See 6. below. - Download the report
To download and save the report, just click the report with the right mouse button. A dialogue will open offereing you options to save this report on your local machine. The report is an image in jpg format. To close the report, just close the report tab in your web browser. - Continue with another case
If you want to continue evaluating another case, just click the "New Case" menu item of the top menu bar.
6. My Cases
The "My Cases" section always shows all old cases, that you as a user generated a report for.
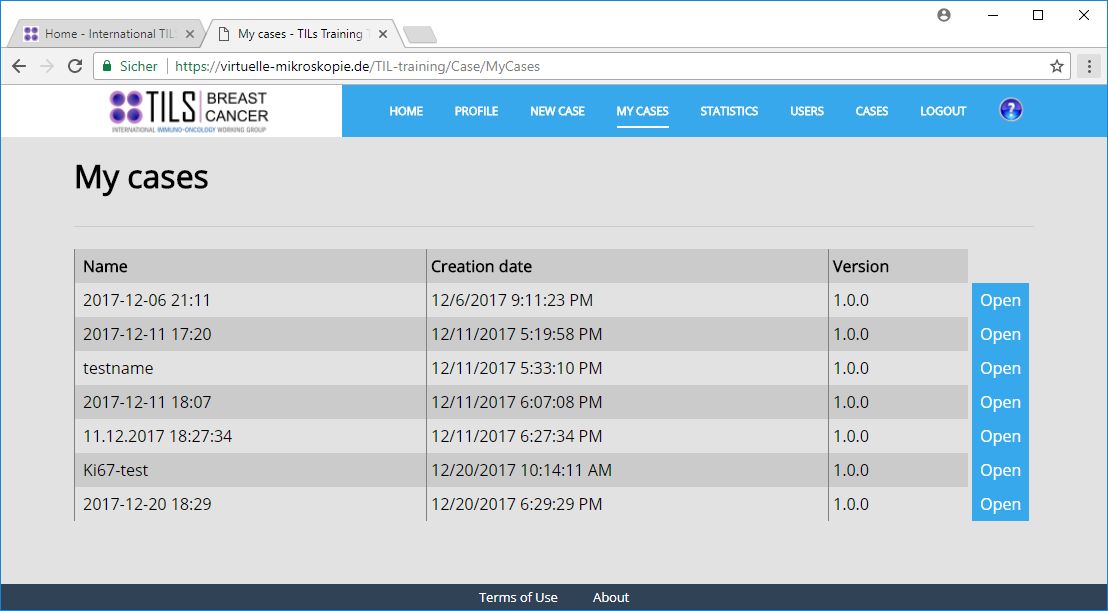
6.1. Reviewing old cases
To review a case, choose "My Cases" from the top menu bar.
All cases that you as a user generated a report for will be displayed with name,
creation date and software version. To see the details, click the "Edit" link
next to the case you want to review. You will be redirected to the case view as
known from perfomring a TILs evaluation.
6.2. Changing old cases
To change an old case, open a case as descibed in 6.1, see above.
To change ratings, just perform the same steps as in 5.1, see above. Once you
hit a save button the changes will apply. Please note that altered cases will
still show the date of the creation, not of the altering.
7. Training
The main menu offers the "training" menu item, which is meant for self-training your evaluation skills and getting a score showing your performance.
7.1. Performing the self-training
- Select the disease group and training mode
To do a self-training, first select a disease group and training type. Once you move the mouse to the "training" menu item, the available trainings will show up. Select the desired disease group and training type. The training types are:
- "with reference" means, you train your skills in the same way as in the "new case" function. So you will still see the reference images on the left and you can switch to other reference sets where available to assist you with the scoring.
- "without reference" means, you will just get images for evaluation, without having reference images. This is the advanced mode, that simulates the real diagnostic process. - Evaluate the images
The system will start showing you random images of the disease group. All of those images have been rated by experts before.
Just rate each image by choosing the matching score and save it. Once you saved, the next random image will be shown. At the top right the menu bar will show you the amount of images already evaluated. Do as much evaluations as you want. - Get the result
If you want to see your result, just stop doing evaluations and click the "Training result" item at the top right menu bar instead.
An image will pop up showing your training result. The meanings are:
- The horiziontal axis gives the correct values, the vertical axis your values.
- Each spot in the graphic shows one of your evaluations. If a spot is on the yellow diagonal axis, your evaluation hit the expert evaluation exactly. The larger the distance of a spot to the diagonal axis, the poorer the evaluation.
- The top left header will tell you the disease group and your score. The score is 100% minus your average deviation. So the higher the score, the better your result.
- the bottom line gives you the date, time , user name and standard deviation of your training. - Save your result
For reasons of privacy protection, the personalized self-training results are NOT publicly available on the system and are not saved in the database. If you want to keep your results, please click on the result image with the right mouse button and choose "save image as". That allows you to download your result image and save it locally on your machine.